TENS Electrode Placement for Lower Back Pain: A Visual Setup Guide
ALT: Visual guide to TENS electrode placement on lower back for effective drug-free pain relief at home
TENS Electrode Placement for Lower Back Pain: Why Location Is Everything
Key Conclusion: Correct TENS electrode placement for lower back pain is the single most important factor determining whether your therapy session delivers meaningful relief or disappointing results. Placing pads in the right anatomical zones activates the gate-control pain mechanism and promotes endorphin release, providing drug-free, clinically grounded relief. This visual setup guide walks you through every placement detail — from skin preparation to pad positioning — so you can replicate the same precision used in professional physical therapy settings, right at home.
Lower back pain is one of the most common complaints among adults worldwide, and yet millions of sufferers rely on medications that carry significant side-effect profiles. TENS therapy (Transcutaneous Electrical Nerve Stimulation) has emerged as a compelling non-pharmacological alternative — but its effectiveness depends heavily on execution. Three core factors determine outcomes: the device quality, the intensity settings, and — perhaps most critically — where you place the electrodes. This guide focuses entirely on that third factor, giving you the visual and practical knowledge to get electrode placement right the first time.
Who This Guide Is For: Applicable Scenarios and Cautions
✅ Applicable Scenarios:
- Adults experiencing chronic lower back pain from muscle tension, postural strain, or degenerative disc discomfort
- Post-injury or post-surgical patients (cleared by a physician) seeking drug-free pain management during recovery
- Active individuals, athletes, and seniors managing acute or recurring lumbar discomfort without wanting to rely on pain medication
- Anyone new to home TENS therapy who wants clear, visual guidance before starting their first session
❌ Not Applicable/Cautions:
- Individuals with implanted pacemakers, defibrillators, or other electronic medical devices — electrical stimulation can interfere with device function
- Do not place electrodes directly over the spine, on broken or irritated skin, near the heart, or on the abdomen during pregnancy
- Those with diagnosed nerve damage, active infections, or malignancy in the treatment area should consult a physician before use
- Children under 18 and individuals with epilepsy or uncontrolled seizure disorders should seek medical guidance prior to use
Understanding Why TENS Works for Lower Back Pain
Lower back pain affects an estimated 619 million people globally, making it the leading cause of disability worldwide according to the World Health Organization. For many sufferers, the journey toward relief involves a frustrating cycle of medications, temporary fixes, and lingering discomfort.
This is where TENS therapy offers a genuinely different pathway. To understand what TENS therapy is and how it relieves pain without drugs, it helps to know how the underlying mechanisms work. TENS devices deliver low-voltage electrical impulses through adhesive electrode pads placed on the skin. These impulses work through two primary mechanisms:
1. Gate Control Theory: Electrical signals from TENS units travel faster through nerve fibers than pain signals, effectively "closing the gate" to pain transmission before it reaches the brain. This is the primary reason why you feel a buzzing or tingling sensation that overrides pain.
2. Endorphin Release: At lower frequencies, TENS stimulation encourages the body to release its own natural pain-relieving chemicals — endorphins — providing longer-lasting relief that can outlast the session itself.
What makes lower back pain particularly well-suited for TENS therapy is the anatomical accessibility of the lumbar region. The muscles and nerves responsible for most lower back pain — including the erector spinae, multifidus, and the branches of the lumbar plexus — lie relatively close to the skin surface, making them ideal targets for transcutaneous (through-the-skin) stimulation.
However, the lumbar spine is also a sensitive area. Placing pads incorrectly — on the bony spine itself, too close to the kidneys, or misaligned with the pain-generating muscles — can either produce no effect or, in rare cases, cause discomfort. This is why a precise, visual placement guide matters. If you're also interested in how TENS compares to EMS for muscle recovery, understanding the difference between EMS and TENS will help you choose the right modality for your specific needs.
For those selecting a home device, reviewing a TENS unit buyer's guide covering what to look for in a home electrotherapy device is a smart first step before committing to a purchase.
The Visual Setup Guide: Step-by-Step Electrode Placement for Lower Back Pain
Three-Step Quick Start
Step 1: Prepare Your Skin and Supplies
Before placing any electrode, clean the target area of your lower back with mild soap and water or an alcohol wipe, then allow it to dry completely. Skin oils, lotions, and sweat reduce electrode adhesion and conductivity, diminishing the electrical signal. Check your electrode pads — they should feel tacky and moist, not dry or worn. Dry pads deliver uneven stimulation and can cause skin irritation. Gather your TENS unit, lead wires, and pads before lying down or sitting in a supported position. This preparation stage typically takes 3–5 minutes and is worth every second.
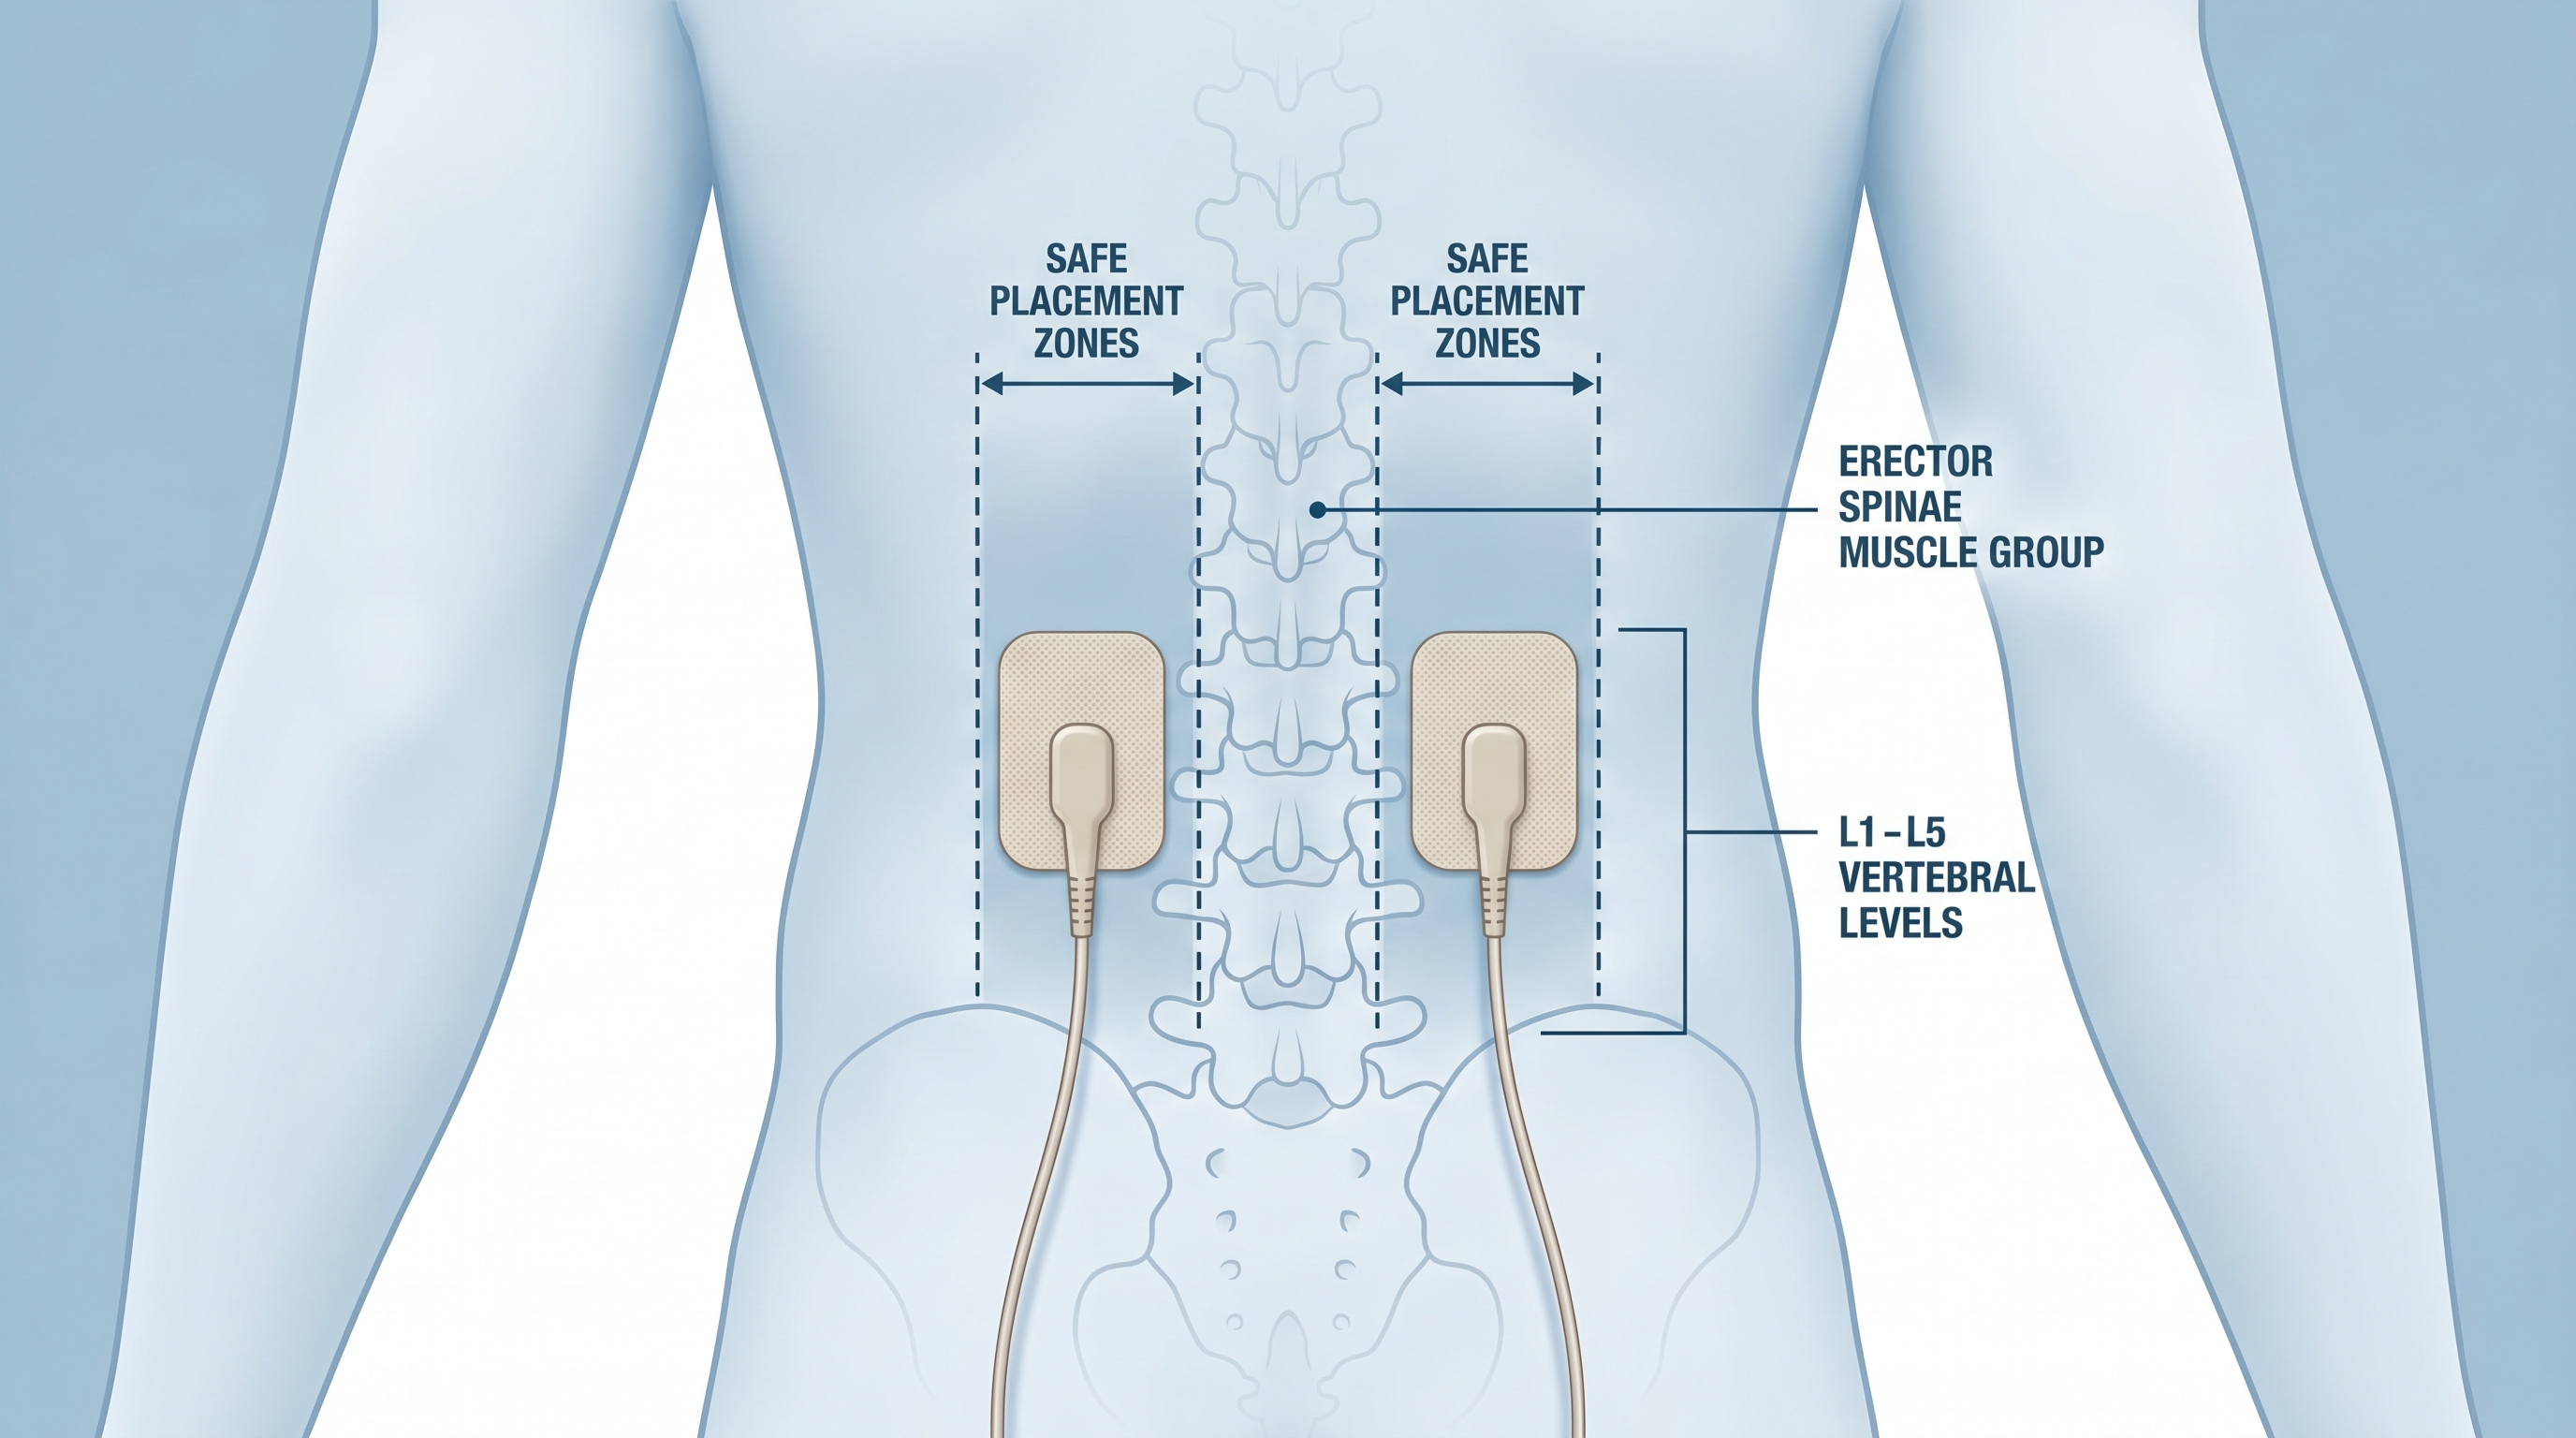
Step 2: Identify Your Placement Zone on the Lower Back
The target zone for lower back TENS placement is the lumbar region, spanning roughly from the lower rib cage to the top of the pelvis (approximately the L1–L5 vertebral levels). The key rule: pads go on either side of the spine, never directly over the vertebrae themselves. For general lower back pain, place two pads in a vertical or slightly diagonal orientation on each side of the spinal column — roughly 1–2 finger-widths from the midline. For pain that radiates into the glutes or one side of the back, position the pads to bracket the most painful area, with one pad above and one below the pain epicenter.
Step 3: Connect, Power On, and Calibrate Intensity
Attach your lead wires to the electrode pads before connecting to the TENS unit — this prevents accidental shocks. Power on the device and start at the lowest intensity setting. Gradually increase until you feel a comfortable tingling or buzzing sensation — noticeable but never painful or sharp. A mild muscle twitch is acceptable with some frequency settings; however, if you feel sharp pain, stabbing, or burning, reduce intensity immediately and recheck pad placement. Most effective sessions for lower back pain last between 20–30 minutes per area.
Placement Configuration Comparison: Which Pattern Works Best for You?
Different lower back pain presentations respond to different electrode configurations. The following comparison helps you match your pattern to your pain type.
| Placement Configuration | Best For | Pad Position | Notes |
|---|---|---|---|
| Bilateral Vertical (most common) | General lumbar muscle tension, bilateral lower back ache | Two pads on each side of spine, oriented vertically | Best starting point for new users; covers erector spinae effectively |
| Bilateral Diagonal | Muscle strains with radiating discomfort into the hip | Pads angled at 45° following muscle fiber direction | Follows muscle grain for more targeted stimulation |
| Unilateral Bracketing | One-sided lower back pain, sciatica-origin discomfort | Two pads on affected side only, one above and one below pain zone | Focuses stimulation; avoid placing pads directly on sciatic nerve path without guidance |
| Cross-Pattern (4 pads) | Widespread lumbar and sacral pain | Four pads in a square pattern bracketing the entire pain region | Requires dual-channel TENS unit; provides broader coverage |
Detailed Placement Guide by Pain Type
General Lumbar Muscle Pain
General lumbar muscle pain — the kind that comes from sitting too long, poor posture, or physical overexertion — is the most common lower back complaint, and it responds exceptionally well to TENS therapy.
For this presentation, use the bilateral vertical configuration. Place one electrode approximately at the L1–L2 level (just below the bottom of the rib cage) and the second electrode approximately at the L4–L5 level (just above the posterior iliac crest, the bony ridge of the pelvis) on each side of the spine. This configuration brackets the main lumbar muscles — primarily the erector spinae and multifidus — delivering stimulation along the full length of the muscle belly.
Ensure at least 1 inch of space between adjacent pads and at least 1–2 finger-widths of space from the spine itself. Running pads too close together reduces the current's reach into deeper tissue; running them over the spine can cause discomfort without therapeutic benefit.
Sacroiliac Joint and Lower Lumbar Pain
Sacroiliac (SI) joint pain sits lower than typical lumbar pain, often felt as a dull ache near the dimples of the lower back, sometimes extending into the upper buttock. For this presentation, shift your pads slightly downward — one pad at the L4–L5 level and the second pad over the sacral region (the flat, triangular bone at the base of the spine), staying lateral to the spinous processes on the affected side.
Many users find a diagonal orientation — running from upper-inner to lower-outer — more effective for SI joint pain, as it aligns more closely with the ligamentous structures involved.
Radiating Pain With Gluteal Involvement
When lower back pain radiates into the glutes or the side of the hip, a unilateral bracketing approach combined with a second pad placement in the upper gluteal region can provide more comprehensive relief. Place the first pad in the lumbar region (L3–L5 level) and the second pad in the upper gluteal muscle, lateral to the sacrum. This configuration follows the pain referral pathway, stimulating both the source region and the area where pain is experienced.
Important caution: Do not place pads directly over the sciatic nerve pathway or the back of the knee without clinical guidance, as this can produce intense or uncomfortable sensations.
Using Four Pads for Wider Coverage
Many quality TENS units, including those in the iStim lineup, support dual-channel operation, allowing four pads to be used simultaneously. For widespread lower back pain, a four-pad cross-pattern provides excellent coverage. Place two pads at the upper lumbar region (bilateral) and two pads at the lower lumbar/sacral region (bilateral), creating a rectangular configuration that covers the entire lumbar zone. This approach is particularly effective for users with diffuse, hard-to-localize lower back aches.
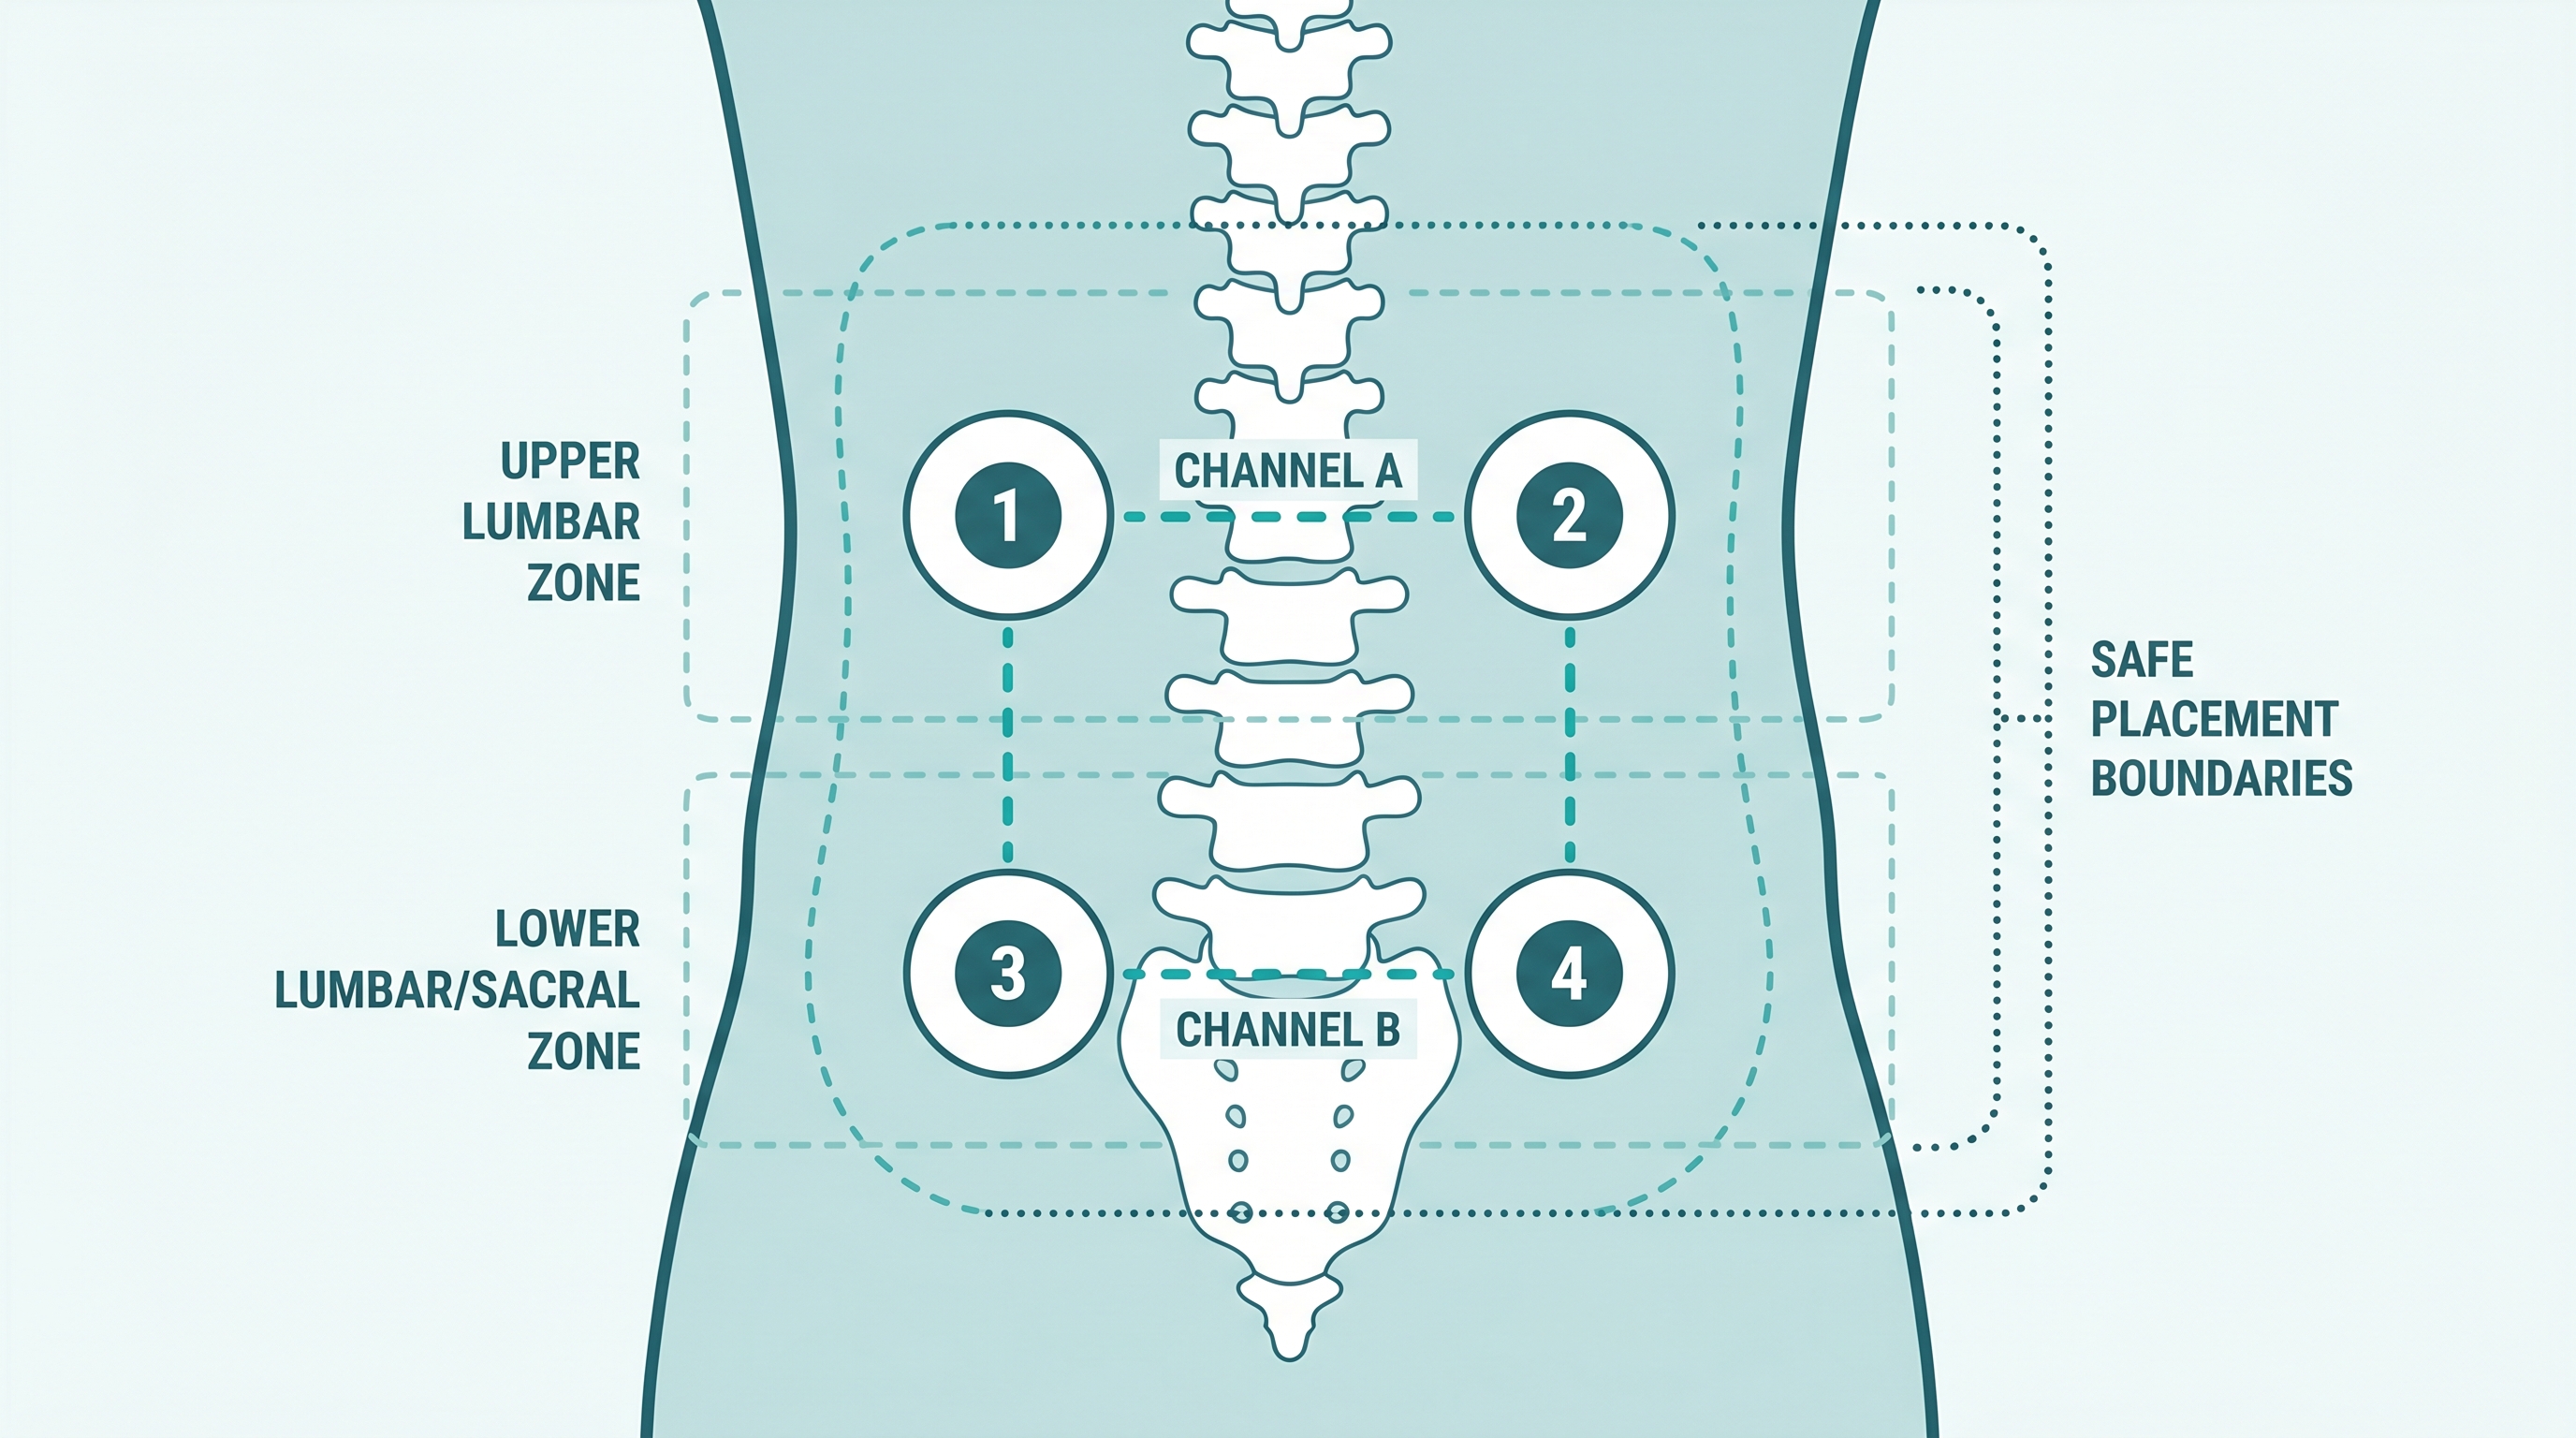
ALT: Four TENS electrode pads arranged in cross-pattern on lower back for bilateral lumbar pain relief using dual-channel TENS device
Advanced Considerations: Fine-Tuning Your TENS Sessions for Better Results
Frequency and Pulse Width Matter As Much As Placement
Electrode placement gets your pads in the right neighborhood, but frequency settings determine which pain mechanism you're activating. Higher frequencies (typically 80–120 Hz) activate the gate control mechanism for immediate relief — ideal for acute flare-ups. Lower frequencies (typically 2–10 Hz) are more effective at triggering endorphin release, making them better suited for chronic pain management with longer-lasting effects. Many quality home TENS units offer pre-programmed modes that cycle between frequencies — these can be excellent starting points.
Pad Rotation and Skin Care
A commonly overlooked aspect of TENS therapy is skin health beneath the pads. Using the same exact placement spot repeatedly, day after day, can cause mild skin irritation from adhesive buildup or sustained electrical stimulation. Rotate your pad positions by small increments (1–2 cm) between sessions to allow skin recovery. Always inspect the skin after removing pads — mild redness that fades within 30 minutes is normal; persistent redness, blistering, or pain is a signal to stop and consult a healthcare provider.
Common Misconception: "More Intensity Equals Better Relief"
One of the most persistent TENS misconceptions is that higher intensity always produces better outcomes. In practice, the therapeutic window for TENS is a comfortable, strong tingling — not pain. Exceeding this threshold activates protective muscle contractions and can increase discomfort. Trust the feeling: if it's uncomfortable, dial it back. Consistent moderate stimulation over a properly placed pad outperforms aggressive intensity every time.
How TENS Compares to Other Home Pain Solutions
For context on how electrotherapy fits within a broader home wellness approach, it's worth noting that TENS addresses pain signaling directly, while EMS focuses on muscle contraction and rehabilitation. These are complementary rather than competing modalities. For users interested in pelvic floor health specifically, the same principle of precise placement applies — understanding what the pelvic floor is and why it matters for women's health provides an important foundation before beginning any pelvic electrotherapy program.
Frequently Asked Questions FAQ
Q1: How many TENS pads should I use for lower back pain, and does more mean better coverage?
Most lower back pain presentations are effectively addressed with two to four electrode pads. Two pads in a bilateral vertical configuration cover the core lumbar muscles well for most users. Four pads (dual-channel) provide broader coverage for widespread pain. Using more pads than necessary can dilute the electrical current and reduce effectiveness. Start with two pads in the recommended configuration, assess the results after a few sessions, and add a second channel only if your pain covers a wider area than two pads can address.
Q2: Is it safe to use a TENS unit on my lower back every day?
For most healthy adults without contraindications, daily TENS use on the lower back is considered safe when following manufacturer guidelines. Sessions are typically recommended at 20–30 minutes per area, with adequate rest between sessions to allow skin recovery. However, TENS is not a substitute for diagnosing or treating the underlying cause of pain. If your lower back pain persists, worsens, or is accompanied by neurological symptoms such as leg weakness or bladder changes, consult a physician. Long-term daily use is best supervised by a healthcare provider.
Q3: How long does it take to feel relief from TENS therapy for lower back pain?
Many users report noticeable reduction in lower back pain within the first 20–30 minute session, particularly when using higher-frequency settings that activate the gate control mechanism. However, the most meaningful and lasting results typically develop over multiple sessions — often after 5–10 consistent uses. Chronic lower back pain conditions may require several weeks of regular therapy before cumulative benefits become fully apparent. Electrode placement accuracy, appropriate frequency settings, and consistent session scheduling all contribute to how quickly you experience results.
Summary
Effective TENS therapy for lower back pain rests on three pillars: the right device, the right settings, and — most critically — the right electrode placement. This guide has given you a comprehensive, visual-style framework for understanding and executing correct lower back pad placement across the most common pain presentations, from general lumbar muscle tension to SI joint discomfort and radiating gluteal pain.
The three core takeaways to carry forward are:
- Place pads lateral to the spine, never directly over vertebrae — this is the foundational rule that protects you and ensures effective stimulation of the target muscles and nerves.
- Match your placement pattern to your pain type — bilateral vertical for general lumbar pain, diagonal for muscle strains, unilateral bracketing for one-sided or radiating pain, and four-pad cross-pattern for widespread coverage.
- Prepare your skin, start at low intensity, and build gradually — the quality of your pad adhesion and your approach to intensity calibration are just as important as where you place the pads.
TENS therapy is one of the most well-researched, accessible, and genuinely effective tools available for drug-free pain management at home. With proper placement knowledge, you're positioned to get the most from every session.
Ready to take control of your pain relief and muscle health from the comfort of home? iStim offers a full range of professional-grade TENS, EMS, and Kegel devices engineered for safe, effective, drug-free therapy trusted by over 20,000 customers. Explore the complete lineup and find the right device for your needs at https://istim.com/.
References
- World Health Organization. "Low Back Pain — Key Facts and Global Burden".
https://www.who.int/news-room/fact-sheets/detail/low-back-pain - National Institute of Neurological Disorders and Stroke (NINDS). "Low Back Pain Fact Sheet".
https://www.ninds.nih.gov/health-information/patient-caregiver-education/fact-sheets/low-back-pain-fact-sheet - American Physical Therapy Association (APTA). "Physical Therapist's Guide to Low Back Pain".
https://www.choosept.com/guide/physical-therapist-s-guide-low-back-pain - Cochrane Library. "Transcutaneous electrical nerve stimulation (TENS) for chronic low-back pain".
https://www.cochranelibrary.com/cdsr/doi/10.1002/14651858.CD003008/full - National Center for Complementary and Integrative Health (NCCIH), NIH. "Chronic Pain: What You Need To Know".
https://www.nccih.nih.gov/health/chronic-pain-what-you-need-to-know
Note: Standards and clinical guidelines may be updated. Please consult the latest official documents or a qualified healthcare professional for the most current recommendations.
About iStim
iStim is a Los Angeles-based electrotherapy brand specializing in professional-grade TENS, EMS, and Kegel devices designed for home use, combining ISO-certified Taiwanese manufacturing with a commitment to drug-free pain relief and muscle stimulation trusted by 20,000+ customers worldwide. Learn more at https://istim.com/.
Disclaimer: This article is provided for informational and educational purposes only and does not constitute medical advice. The content is produced in association with iStim and reflects general wellness information. Always consult a qualified healthcare professional before beginning any new therapy or treatment program. © iStim. All rights reserved.
Leave a comment