Full Body TENS Electrode Placement Reference: 10 Common Treatment Sites

ALT: Full body TENS electrode placement reference guide showing 10 common treatment sites for drug-free pain relief at home
Where You Place TENS Electrodes Matters: A Full Body Placement Reference for 10 Common Treatment Sites
Key Conclusion: Proper TENS electrode placement is the single most important factor determining whether your therapy session delivers meaningful pain relief or falls flat. By understanding the anatomy behind each treatment site — from the lower back and neck to the knees, shoulders, and feet — you can apply your TENS unit with clinical precision at home. This guide covers 10 of the most commonly treated body regions, empowering you to get consistent, drug-free results safely and confidently.
Getting a TENS device is the first step. Knowing exactly where to place the electrodes is what transforms it from a gadget into a genuine pain management tool. Whether you're managing chronic back pain, recovering from a sports injury, or working through post-surgical discomfort, electrode placement directly shapes the quality of stimulation your nerves receive.
This guide is designed to demystify TENS electrode placement for real people dealing with real pain — no clinical jargon, no guesswork. We'll walk through 10 treatment sites with clear instructions and explain the underlying reasoning so you can feel confident every time you set up your device.
Who This Guide Is For
✅ Applicable Scenarios:
- Adults managing chronic pain conditions such as lower back pain, sciatica, fibromyalgia, or arthritis
- Post-injury or post-surgery patients cleared by their physician to use electrotherapy at home
- Fitness enthusiasts using TENS for muscle recovery and soreness relief after intense training
- Individuals experiencing localized nerve pain, joint discomfort, or tension headaches
❌ Not Applicable/Cautions:
- Individuals with implanted electronic devices such as pacemakers or defibrillators — TENS stimulation can interfere with these devices
- People with active skin infections, open wounds, rashes, or broken skin at the intended electrode site
- Pregnant women, unless explicitly cleared by a healthcare provider — certain placement areas are contraindicated
- Those with epilepsy or a history of seizures should consult a neurologist before use
Why Electrode Placement Is the Foundation of Effective TENS Therapy
Transcutaneous Electrical Nerve Stimulation (TENS) works by delivering low-voltage electrical impulses through the skin to interrupt or modulate pain signals traveling through the nervous system. It's a well-established, non-invasive approach that has been studied for decades and is recommended by physical therapists, pain specialists, and rehabilitation clinicians worldwide.
According to research and clinical practice, TENS works through two primary mechanisms. At higher frequencies, it activates the "gate control" mechanism — essentially closing the neural gateway through which pain signals travel to the brain. At lower frequencies, it stimulates the production of endorphins, the body's natural painkillers. Both mechanisms are highly placement-dependent: the electrodes must be positioned relative to the specific nerve pathways and muscle groups involved in your pain.
The global market for TENS and electrotherapy devices has grown significantly as more people seek non-pharmaceutical alternatives to pain management. Chronic pain affects hundreds of millions of adults globally, and opioid dependency concerns have driven renewed interest in safe, drug-free tools like TENS. What clinical professionals have known for years — that correct electrode positioning is essential — is now knowledge that home users need access to as well.
This is exactly where a reliable TENS electrode placement guide becomes invaluable. Understanding the anatomical rationale behind each placement empowers you to move beyond trial-and-error and into consistent, effective therapy. iStim's professional-grade TENS devices are designed with the home user in mind, pairing clinical-quality stimulation with approachable, easy-to-follow guidance. Explore the full range at istim.com.
The Complete TENS Electrode Placement Guide: 10 Common Treatment Sites
Three-Step Quick Start for Any Treatment Site
Step 1: Prepare Your Skin and Electrodes
Clean the skin at your intended treatment site with mild soap and water, then pat dry thoroughly. Oils, lotions, and sweat create barriers that reduce electrode adhesion and conductivity. If you have significant body hair at the site, consider trimming it lightly to ensure good contact. Inspect your electrode pads — they should feel tacky and moist, not dried out. Proper skin prep takes just two to three minutes but dramatically improves both comfort and therapy effectiveness.
Step 2: Position Electrodes Correctly for Your Target Site
Using the site-by-site guidance below, place your electrode pads as directed, ensuring they lie flat against the skin without wrinkles or lifting edges. Electrodes should never overlap each other, touch metal objects, or be placed directly over bony prominences (such as the spine itself or the kneecap). Leave at least one inch of space between pads. Connect the lead wires before turning on your device. Positioning takes roughly one to two minutes once you're familiar with each site.
Step 3: Start Low and Adjust to Your Comfort Level
Turn on your TENS unit and begin at the lowest intensity setting. Gradually increase the intensity until you feel a strong but comfortable tingling or buzzing sensation. You should never feel sharp pain or muscle burning — that indicates the intensity is too high. For pain relief, most users find an optimal range that feels noticeable but not uncomfortable. A standard session lasts 15 to 30 minutes. After your session, turn the device off before removing electrodes to protect both the pads and your skin.
Comparing TENS Placement Approaches Across Common Pain Categories
Different pain types respond to different placement strategies. Understanding these distinctions helps you select the right approach before you even apply your first electrode.
| Treatment Approach | Placement Strategy | Best For | Key Consideration |
|---|---|---|---|
| Peripheral/Local Placement | Electrodes placed directly around the painful area | Joint pain, localized muscle soreness | Stay off bony landmarks; surround the pain site |
| Nerve Pathway Placement | Electrodes positioned along the nerve tract | Sciatica, radiating nerve pain | Follow the nerve's anatomical course down the limb |
| Para-spinal Placement | Electrodes placed on either side of the spine | Back pain, spinal-referred pain | Never place directly on the spine; use muscles alongside |
| Acupressure Point Targeting | Electrodes near established acupuncture/trigger points | Widespread muscle tension, fibromyalgia | Requires some anatomical knowledge or guidance |
The 10 Treatment Sites: Detailed Placement Instructions
1. Lower Back (Lumbar Region)
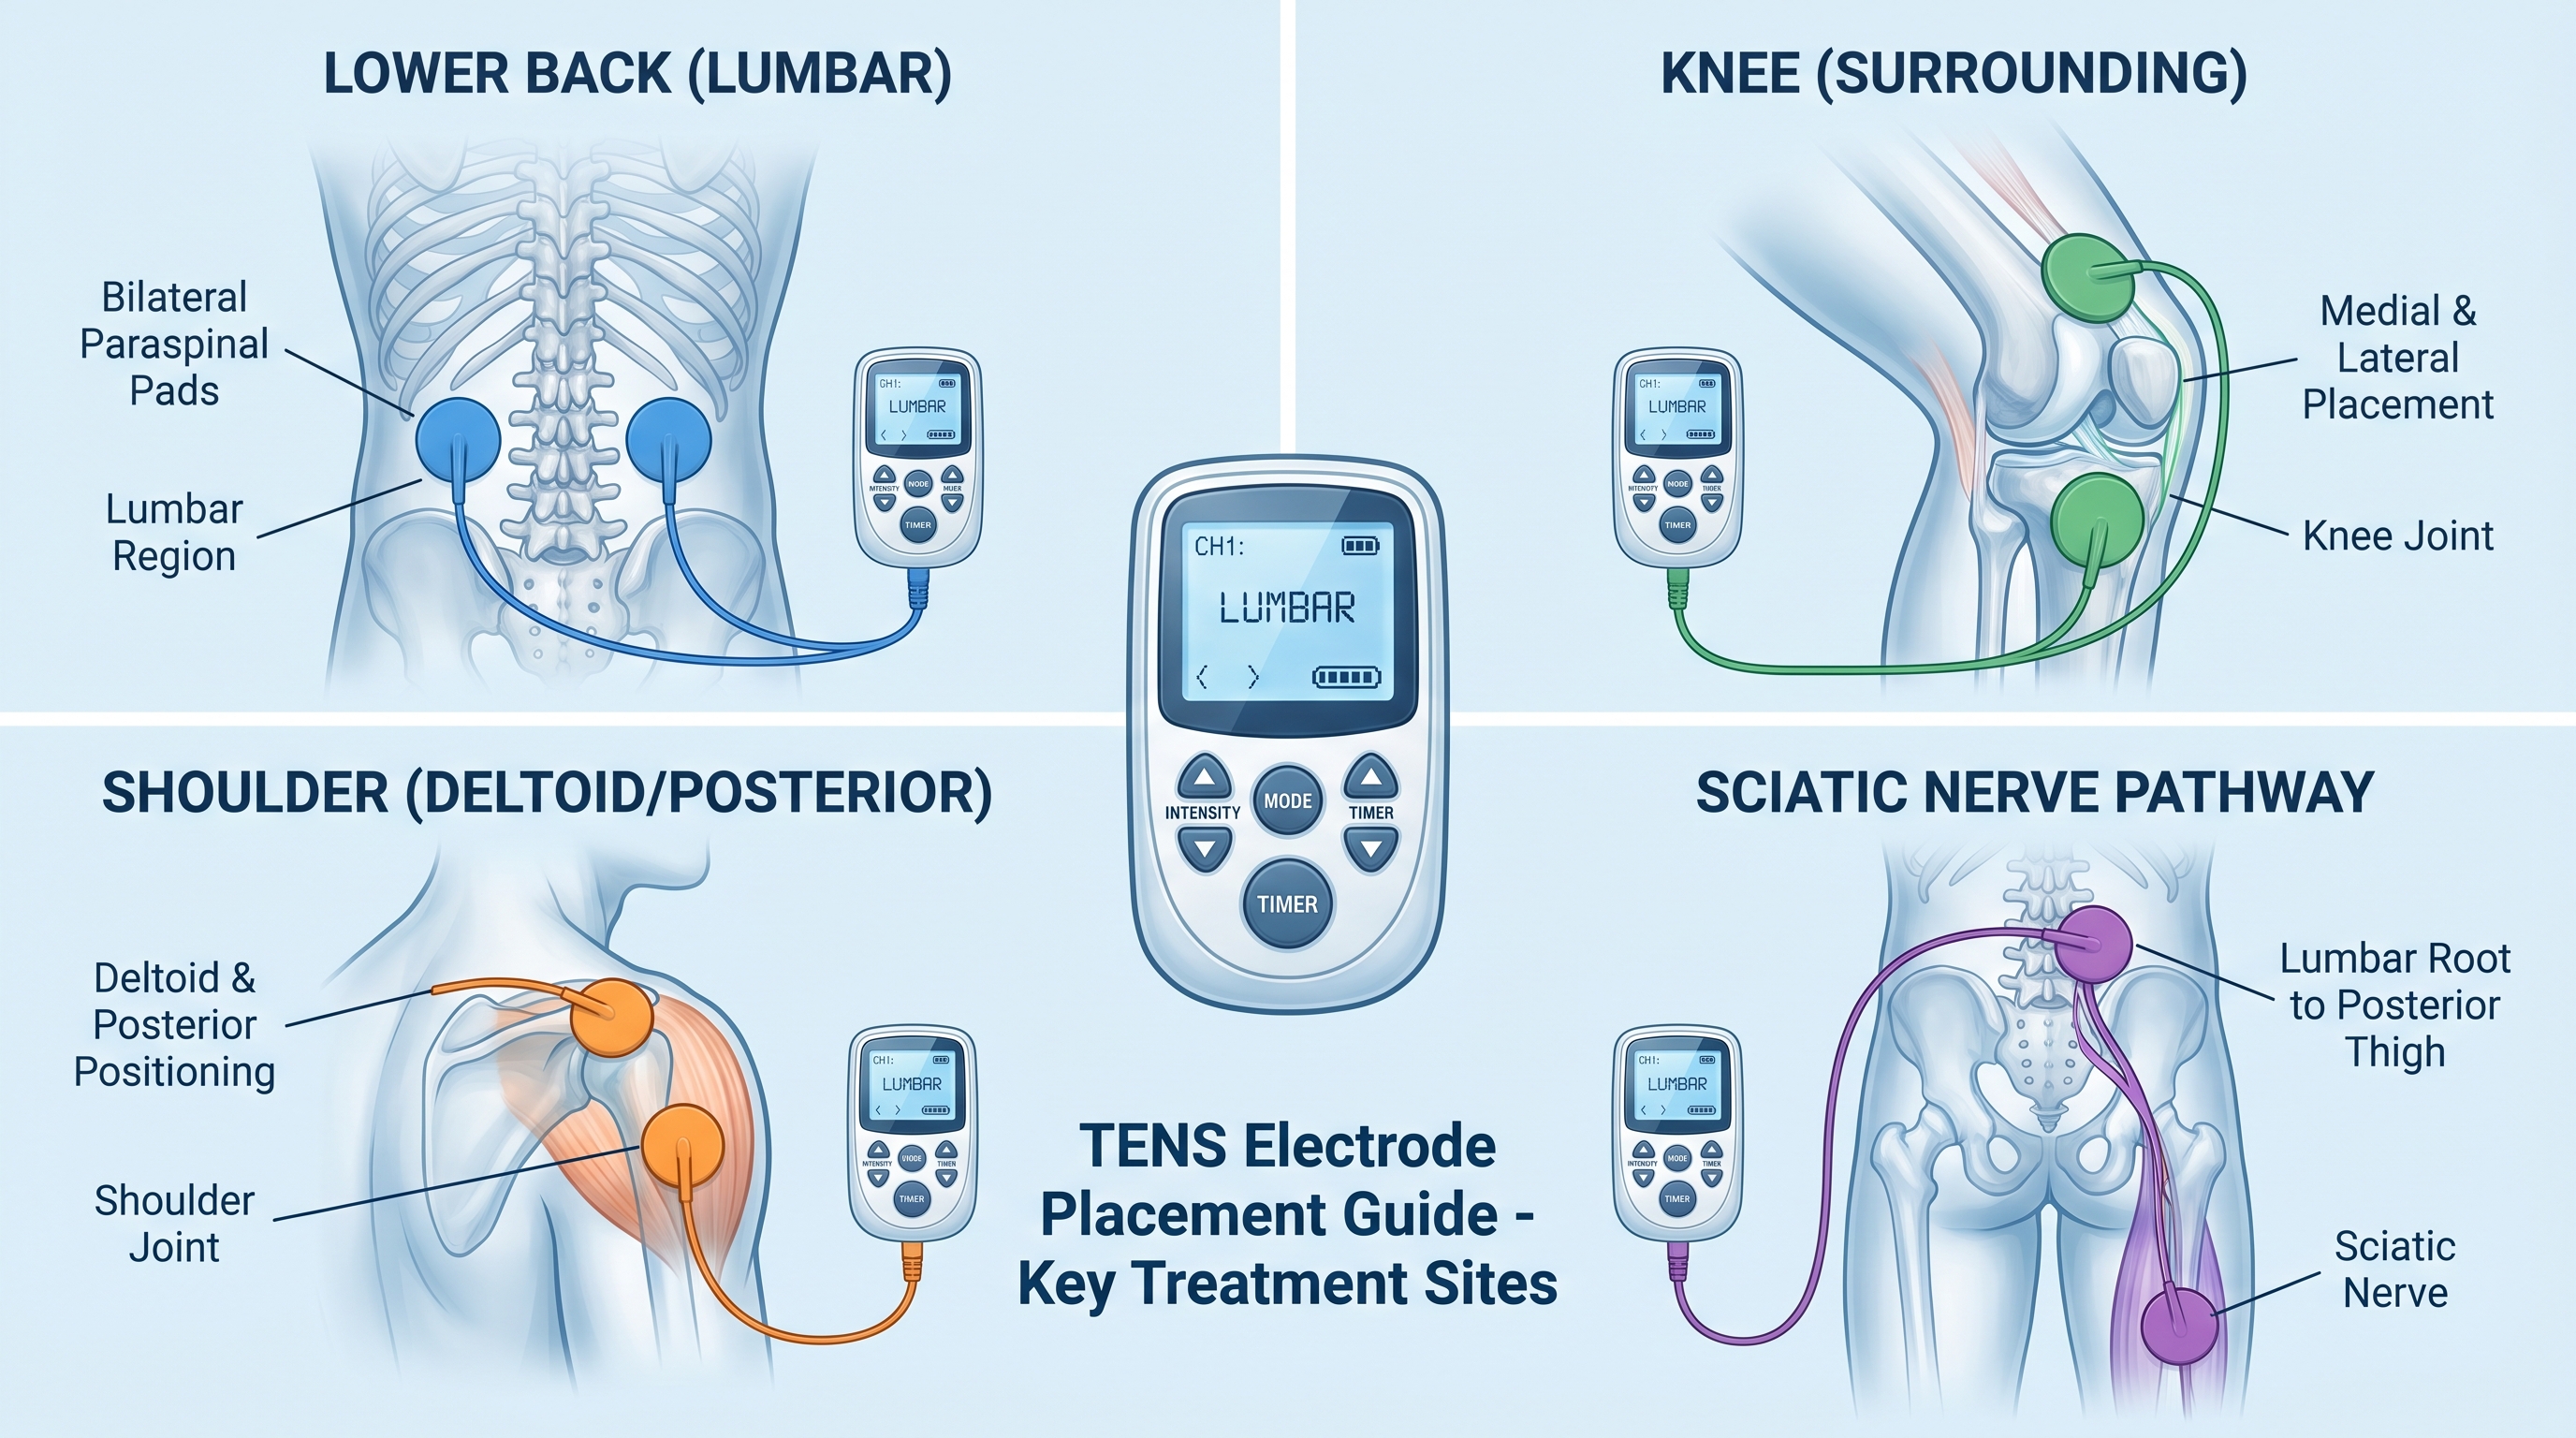
The lower back is the most common TENS treatment site and a primary reason many people invest in a home electrotherapy unit. To treat lumbar pain, place two electrode pads on either side of the spine — not on the spine itself — at the level of your discomfort. The pads should sit on the thick erector spinae muscle groups running parallel to the vertebral column.
For broader coverage, a four-electrode setup works well: place one pair at the upper edge of your pain zone and one pair at the lower edge. This creates a stimulation "field" that spans the full affected area. Many users with chronic low back pain find consistent daily sessions (15–30 minutes) provide cumulative relief over time.
2. Neck and Upper Trapezius
Neck pain and tension headaches often originate in the upper trapezius — the thick band of muscle running from your neck base to your shoulder. Place one electrode on the side of the neck (avoiding the front, where major blood vessels and the carotid artery are located) and one on the upper trap muscle near the shoulder.
A key safety rule: never place TENS electrodes on the front or sides of the throat. This area contains the carotid sinus, which, if stimulated, can cause dangerous drops in blood pressure or heart rhythm irregularities.
3. Shoulder (Rotator Cuff and Deltoid Region)
Shoulder pain from rotator cuff issues, bursitis, or general muscle tension responds well to TENS. Place one pad over the top of the shoulder (the deltoid insertion) and one on the posterior shoulder or upper back depending on where your pain is most concentrated.
For post-surgical shoulder recovery, always confirm with your surgeon that electrotherapy is appropriate before use, and avoid placing electrodes over any surgical hardware sites.
4. Mid-Back (Thoracic Region)
Mid-back pain is often associated with poor posture, extended sitting, or muscle overuse. Apply electrodes on either side of the thoracic spine, on the muscle bellies of the rhomboids or erector spinae in that region. Because rib proximity in this area requires some care, keep the pads positioned along the paraspinal muscles rather than laterally onto the ribs themselves.
5. Hip and Gluteal Region
Hip and glute pain — often tied to bursitis, piriformis syndrome, or referred lower back pain — can be effectively targeted by placing one electrode on the gluteus maximus and one slightly lateral, over the gluteus medius. For sciatic symptoms originating in the glute region (piriformis syndrome), positioning the second electrode slightly lower, toward the piriformis muscle belly, may improve targeting.
6. Knee (Joint Pain and Surrounding Muscles)
Knee pain is another high-frequency use case for home TENS users, particularly among older adults and active individuals. Never place electrodes directly on the kneecap. Instead, use a surrounding placement: one pad on the medial (inner) side of the knee and one on the lateral (outer) side. Alternatively, one pad can be placed above the knee on the quadriceps and one below on the upper shin.
For osteoarthritis knee pain, this surrounding approach helps modulate pain signals from the joint without placing undue electrical current directly through the kneecap.
7. Sciatic Nerve Pathway (Sciatica)
Sciatica — radiating pain traveling from the lower back down through the buttock and into the leg — requires a nerve-pathway placement strategy rather than purely local placement. Position one electrode in the lower back/lumbar region at the nerve root level, and the second along the path of the sciatic nerve (such as the posterior thigh or behind the knee).
This two-point placement follows the nerve's anatomical route, creating stimulation along the nerve tract that can interrupt the radiating pain signal. Some practitioners use a four-electrode approach to cover more of the pathway.
8. Upper Arm and Elbow (Tennis Elbow / Lateral Epicondylitis)
Lateral epicondylitis (tennis elbow) and general forearm/elbow discomfort respond well to TENS when electrodes are placed correctly. Position one pad on the outer forearm (over the extensor muscle group) and one just above or below the epicondyle — the bony prominence on the outside of the elbow. Avoid placing directly on the bony point itself.
This placement targets the forearm extensors and the sensory nerves innervating the lateral elbow region, providing relief for both local tenderness and referred discomfort into the forearm.
9. Foot and Ankle
Foot pain from plantar fasciitis, general ankle soreness, or peripheral neuropathy is increasingly being addressed with TENS therapy at home. For plantar fasciitis, place one electrode on the heel pad and one on the arch of the foot. For ankle pain, a surrounding placement on the medial and lateral malleoli (the bony knobs on either side of the ankle) works well — keeping the pads on the soft tissue alongside the bone rather than directly on it.
Users with diabetic peripheral neuropathy should consult their physician before using TENS on the feet, as sensation may be impaired.
10. Wrist and Hand (Carpal Tunnel and Arthritic Pain)
For wrist and hand conditions including carpal tunnel syndrome and arthritic joint pain, TENS can help modulate pain signals from the median nerve and surrounding tissues. Place one electrode on the inner (volar) surface of the wrist and one on the dorsal (back) surface, flanking the wrist joint. For finger or hand arthritis, the electrode can be placed on the dorsum (back) of the hand with the second on the forearm just above the wrist.
Keep intensity moderate — the hands are more sensitive to stimulation than larger muscle groups, and comfort matters for consistent use.
ALT: Illustrated TENS electrode placement guide showing correct positioning for lower back, knee, shoulder, and sciatica treatment sites using a professional-grade TENS unit
Advanced Tips and Common Misconceptions About TENS Electrode Placement
Special Situations Worth Knowing
Bilateral vs. Unilateral Pain: Many users have pain on one side only (e.g., left knee pain). Use both electrodes on the painful side — resist the urge to place one pad on each side of the body simultaneously unless directed by a clinician, as cross-body stimulation pathways are complex.
Chronic vs. Acute Pain: For acute pain (e.g., a recent muscle strain), high-frequency TENS is typically favored. For chronic conditions, lower frequency settings that stimulate endorphin release may offer greater long-term benefit. Your placement strategy may remain the same, but the frequency setting makes a meaningful difference in mechanism.
Combining TENS with EMS: Some devices offer both TENS and EMS modes. TENS targets pain; EMS targets muscle contraction and strengthening. For post-injury recovery, alternating or combining these therapies (under clinician guidance) can accelerate rehabilitation. iStim's lineup includes dedicated EMS devices precisely for this purpose, making it one of the best ways to combine electrical therapy with active muscle recovery.
Common Misconceptions
"More electrodes = better results": Not necessarily. Proper placement of two well-positioned electrodes often outperforms haphazard use of four. Quality of placement beats quantity.
"TENS works everywhere on the body equally": Certain regions — the chest, front of the throat, directly over the spine, and the head/skull — are contraindicated. TENS is not a one-size-fits-all application.
"If it doesn't tingle intensely, it's not working": A comfortable, moderate tingling is optimal. Chasing high intensity can cause skin irritation and muscle fatigue without proportionally greater benefit.
Frequently Asked Questions FAQ
Q1: How do I know if I'm placing TENS electrodes in the right location for nerve pain?
For nerve pain, the key indicator is that you feel the TENS sensation in the area of your pain or along the nerve pathway — not just at the electrode site itself. For sciatica, for example, you should feel the tingling somewhere along the back of the leg, not exclusively in the lower back. If you're only feeling it at the pads, try adjusting the placement slightly along the nerve's anatomical course. If uncertain, consulting a physical therapist for an initial placement guide session is highly worthwhile.
Q2: Is it safe to use a TENS unit daily for chronic pain management?
For most healthy adults with chronic pain conditions, daily TENS use is considered safe when the device is used as directed. The key precautions are giving your skin time to breathe (remove pads after each session and rotate placement sites slightly to avoid skin irritation), and never using TENS while sleeping, driving, or in water. Always defer to your healthcare provider's guidance, especially if you have underlying health conditions. iStim devices are manufactured to ISO-certified standards to support safe, consistent home use.
Q3: How long does it take to notice results from TENS therapy?
Results vary widely depending on the condition, placement accuracy, frequency settings, and individual physiology. Some users experience meaningful relief within the first one to two sessions; others may need one to two weeks of consistent use to notice cumulative benefit. Chronic conditions generally take longer than acute pain to respond. Most clinical guidelines suggest evaluating results after several weeks of regular use. If you're not experiencing any improvement after consistent correct usage, a healthcare provider review of your placement and settings is recommended.
Summary
Effective TENS therapy at home comes down to three non-negotiable principles: understanding your anatomy, placing electrodes with intentionality, and operating your device safely within its recommended parameters.
The 10 treatment sites covered in this guide — from the lumbar spine and neck to the knees, feet, and wrists — represent the body's most commonly affected pain regions. Each has specific placement rules designed around the nerve pathways, muscle groups, and anatomical structures involved. Respecting those rules is what separates a frustrating experience from genuine, drug-free relief.
The three core takeaways to carry forward:
- Placement over intensity — getting your electrode position right matters more than cranking up the power
- Know your contraindications — certain body regions and health conditions require professional clearance before use
- Consistency builds results — regular, correctly applied sessions compound in benefit over time
Your next step is to assess which of these 10 sites aligns with your primary area of discomfort, set up your device using the three-step quick start, and begin your first session with confidence.
Ready to Experience Clinically-Backed Pain Relief at Home?
Ready to take control of your pain relief and muscle health — without relying on drugs? iStim offers a full range of professional-grade TENS, EMS, and Kegel devices designed to deliver real results safely and effectively from the comfort of your home. Explore the complete lineup and find the right device for your needs at https://istim.com/.
References
- National Institute of Neurological Disorders and Stroke (NINDS). "Pain: Hope Through Research".
https://www.ninds.nih.gov/health-information/patient-caregiver-education/hope-through-research/pain-hope-through-research - American Physical Therapy Association (APTA). "Physical Therapist's Guide to Chronic Pain".
https://www.choosept.com/guide/physical-therapy-guide-chronic-pain - National Center for Complementary and Integrative Health (NCCIH). "Chronic Pain: In Depth".
https://www.nccih.nih.gov/health/chronic-pain-in-depth - Johnson MI. "Transcutaneous Electrical Nerve Stimulation (TENS)". Research to Support Clinical Practice. Oxford University Press.
https://www.ncbi.nlm.nih.gov/books/NBK539803/ - Mayo Clinic. "TENS (Transcutaneous Electrical Nerve Stimulation)".
https://www.mayoclinic.org/tests-procedures/tens/about/pac-20384993
Note: Standards and clinical guidelines may be updated. Please check the latest official documents or consult a qualified healthcare professional for the most current recommendations.
About iStim
iStim is a Los Angeles-based electrotherapy brand specializing in professional-grade TENS, EMS, and Kegel devices for home use, trusted by 20,000+ customers and manufactured to ISO-certified standards for safe, drug-free pain relief and muscle stimulation. Learn more at istim.com.
Disclaimer: This article is provided for informational and educational purposes only and does not constitute medical advice. The content is produced in partnership with iStim. Always consult a qualified healthcare professional before starting any new therapy or treatment. © iStim. All rights reserved.
Leave a comment